
In your Microsoft Clarity project, you may have noticed the “My Watchlist” card in the Dashboard section. Perhaps you’re unsure about its purpose, or you’re already using it but aren’t quite sure how to maximize its benefits.
Either way, you’re in the right place.
In this guide, I’ll walk you through 11 practical use cases to help you unlock the full potential of the Watchlist feature in Microsoft Clarity. These examples will help you use the tool more actively, serve as inspiration for what is possible, and gain quicker insights from your data.
Before I go over the use cases, let’s take a moment to understand what the My Watchlist card does.
A Quick Overview: What Is the “My Watchlist” Feature?
The Watchlist (also referred to as the “My Watchlist” card) is a personalized dashboard widget within Microsoft Clarity.
Any configuration made on this card is only visible to you; other collaborators on the project won’t see your Watchlist.
This feature enables you to closely monitor specific user interactions and behavioral patterns that are most important to you.
Allowing you to track data tied to custom tags, session labels, or segment filters by adding them to your Watchlist.
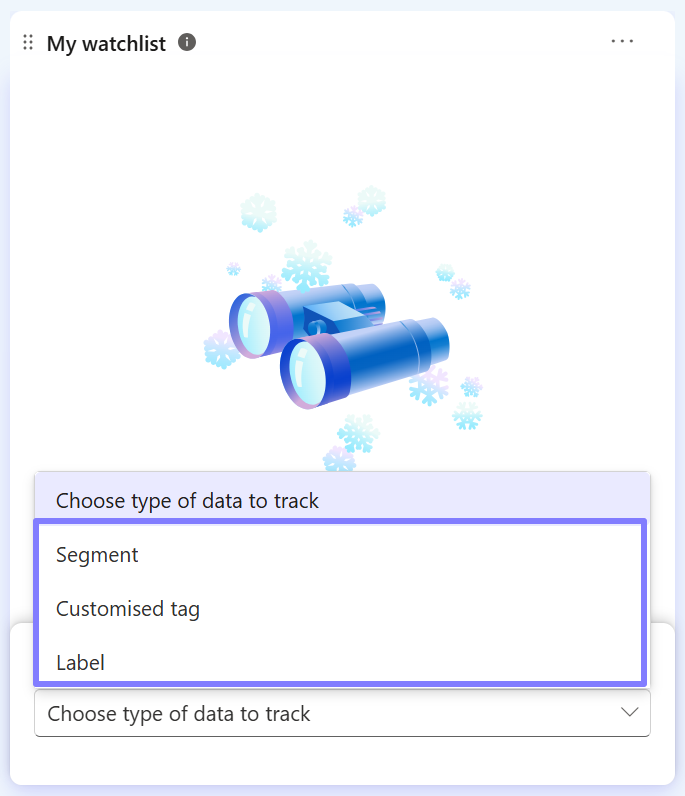
Once you add a custom tag or segment, the card shows the percentage of sessions that match your selection. Even better, when you apply filters across the Clarity dashboard, the Watchlist updates dynamically.
Think of it as your personal insights centre for staying on top of critical behavioural signals in your Clarity data.
Now that you have a clear idea of what this feature does, here are the 11 practical use cases that I’ll go over in this guide.
- Removed an item from the cart1
- Sessions with checkout errors
- Cart Abandonment
- Sessions that triggered a 404 error
- Regional markets traffic watch
- Sessions With Funnel Drop-off at key funnel stages
- Purchases made on mobile vs. desktop devices
- Traction of a newly launched product page or offering
- Critical action or session label
- Dead clicks or rage clicks during checkout
- Sessions with site search
Now that you’ve seen some practical use cases, the next question is: how do you set this up?
I’ll walk you through the steps shortly, but before we proceed, please note that these are just suggestions. Your own Watchlist should reflect the specific business questions you want to answer using Microsoft Clarity, whether that’s on a daily, weekly, or monthly basis. Let’s explore how you can apply these ideas in your Clarity project.
1. Removed an Item From the Cart
If you’re looking to track sessions where users remove items from their cart, the Watchlist card in Microsoft Clarity can help you easily monitor this behaviour.
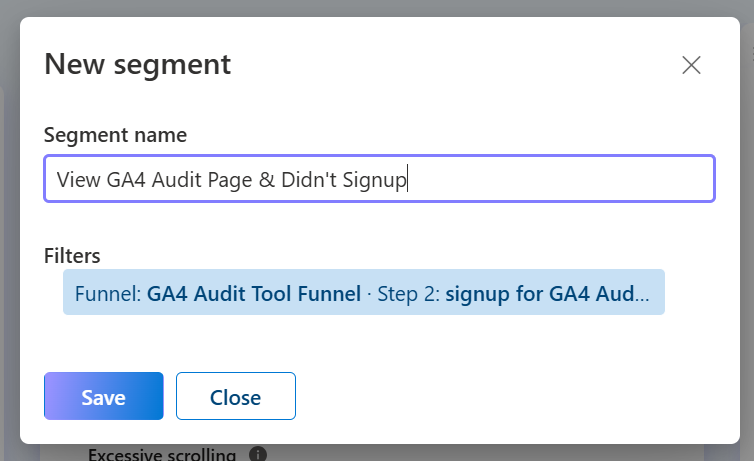
Start by using the Segments feature in Clarity. Create a segment based on the “Remove from Cart” smart event.
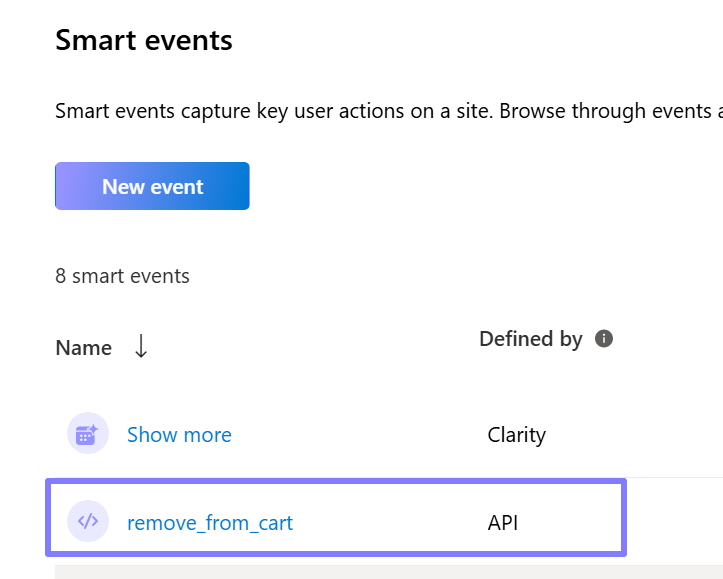
This event can be captured using the API method, which gives you more control and accuracy, and you can learn more about that in this Microsoft Clarity guide about Smart Events:

When setting up the segment, make sure not to include a specific date range in the configuration, as shown below:
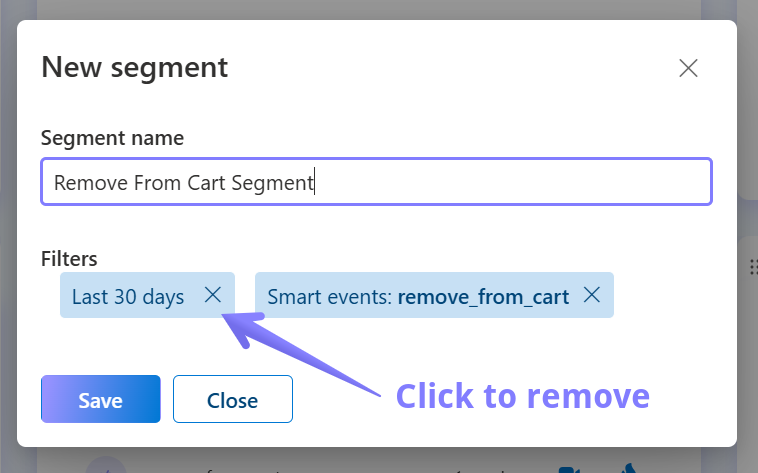
Once the segment is saved, you can add it directly to your Watchlist card.
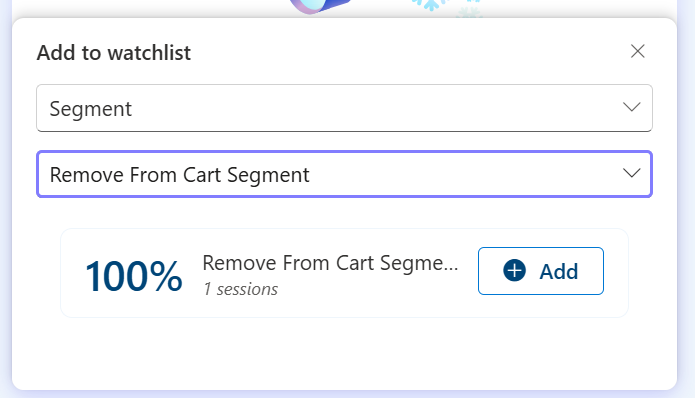
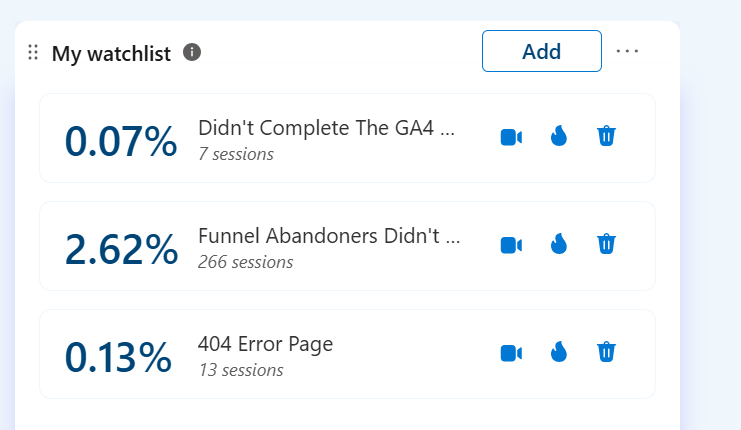
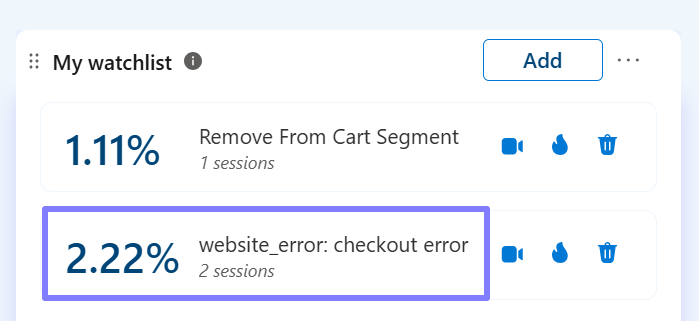
From there, you’ll instantly see the percentage and number of sessions where at least one item was removed from the cart.
Which gives you a quick way to monitor cart behavior and investigate any trends.
For example, further, analyze which products get frequently removed and explore the possible reasons behind this pattern. If the rate is high and continues to increase over time, it may indicate UX issues, pricing concerns, or other factors that warrant attention.
Additionally, you can click to watch session recordings of this item by clicking the video icon.

If you’re not using API events, you can use custom tags instead; just ensure they fire specifically when an item is removed from the cart. That said, smart events typically cover this use case quite well.
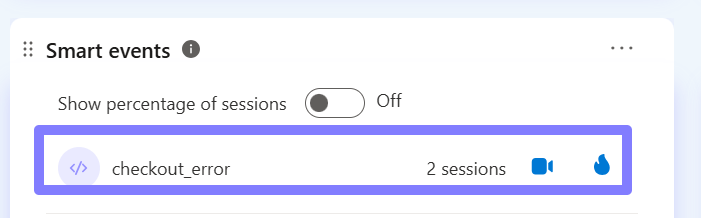
2. Sessions With Checkout Errors
To monitor checkout errors, you can also use Microsoft Clarity’s API events. Trigger an event whenever a user encounters an error during the checkout process.
Alternatively, you can track this behavior using custom tags, as I explained in this guide, which includes several practical examples.

After setting up your event or custom tag, create a corresponding segment (if you are relying on API events). Again, ensure the segment does not include any date filters.
Now, add that segment to your Watchlist card. This will show you the percentage and number of sessions in which users experienced checkout errors, allowing you to identify potential friction points and prioritize fixes to enhance the conversion experience.
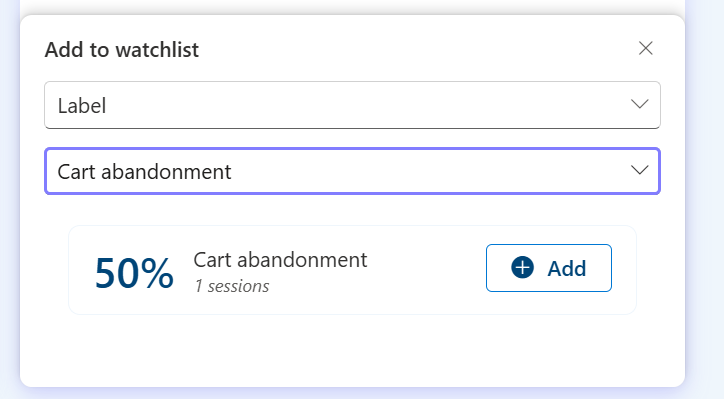
3. Cart Abandonment
Another great use of the Watchlist feature in Microsoft Clarity is tracking cart abandonment sessions where users came close to purchasing but didn’t complete the transaction.
One simple way to do this is by using Microsoft Clarity labels. This is a more manual approach and works well if you don’t yet have a systematic method for tracking cart abandonment as it happens.

You can then use this label when creating a new Watchlist item.
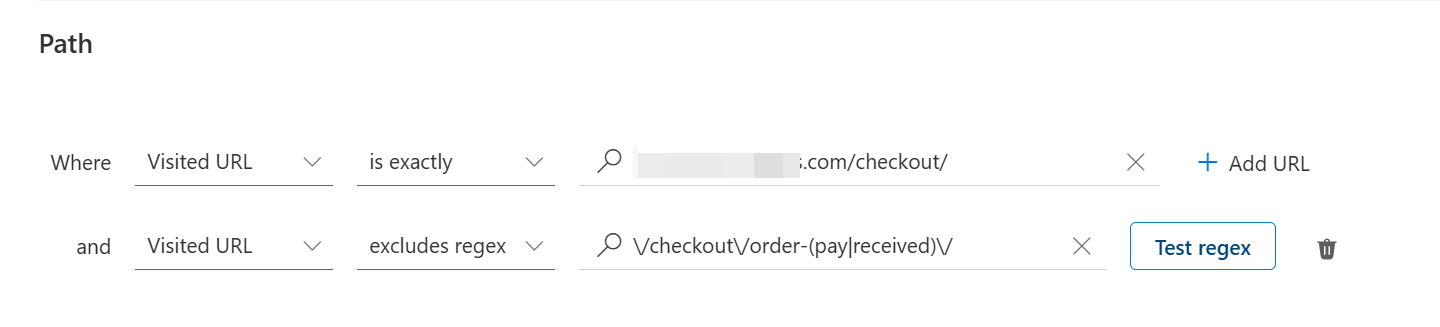
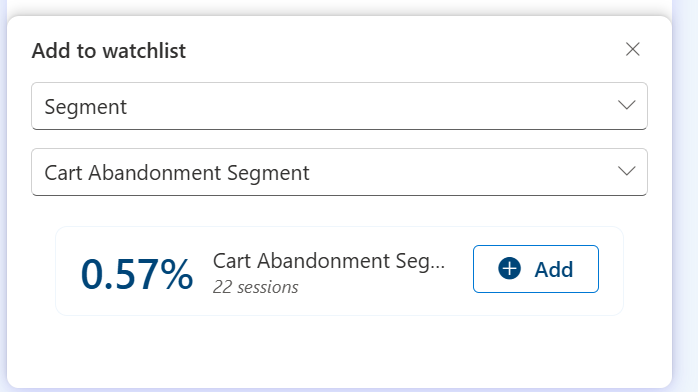
Alternatively, you can define cart abandonment through segments. This method gives you more control and clarity.
For example, you can use a combination of page views and smart events (either Auto Events or API-based) to define what constitutes an abandoned cart, such as visiting the cart page but not reaching the purchase confirmation page.
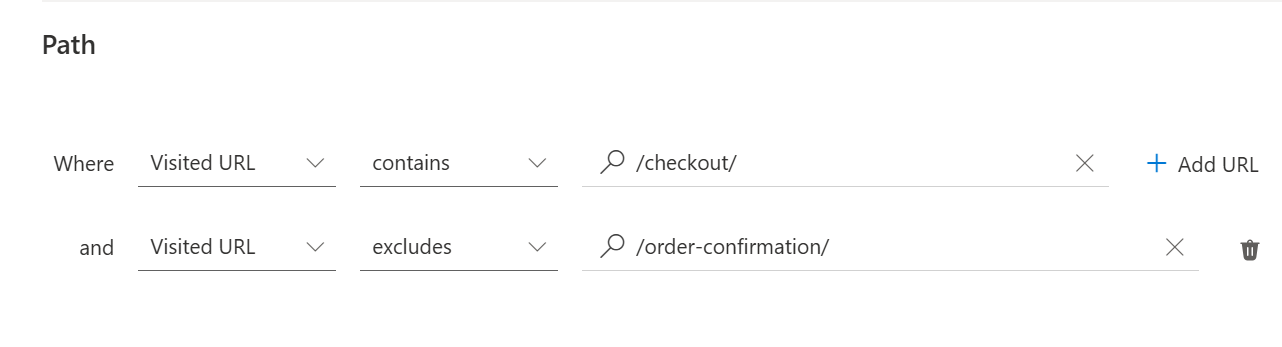
You can also use regular expressions (regex) for a confirmation page with dynamic URLs.
After saving your segment, you can add it to the Watchlist card to start tracking.
If you want to have a more advanced setup, your team might be able to trigger a dedicated abandonment event using the Clarity API Event. This approach is ideal if you want precise tracking and have the technical resources to implement it.
You could also use the funnel abandonment method, which I covered further in this guide.
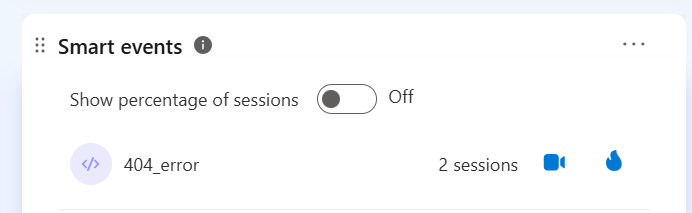
4. Sessions That Triggered a 404 Error
Encountering 404 errors can be frustrating for users and may lead to higher bounce rates or impact conversions. With Microsoft Clarity’s Watchlist card, you can track how often users hit 404 error pages during their sessions.
There are several ways to do this:
Option 1: API Events
You can set up a Clarity API event that fires when a 404 error occurs.
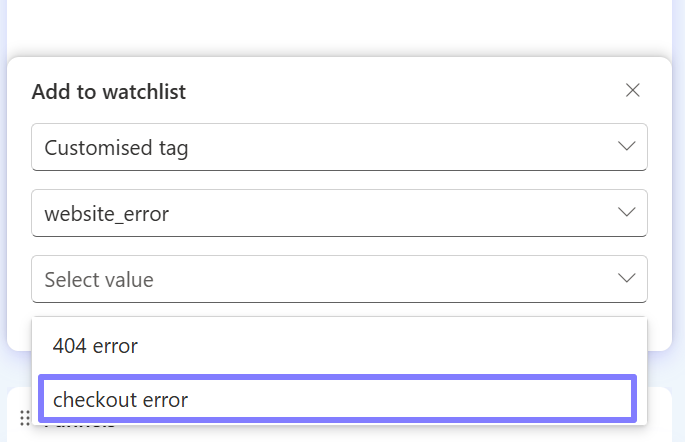
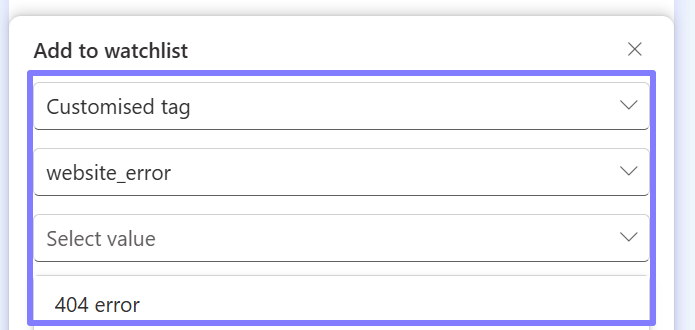
Option 2: Custom Tags
Use custom tags to capture 404 errors. If you are sending the page title as a custom tag to your Microsoft Clarity project, you can also use it, provided that your error pages have consistent page titles, such as “404 Page”, “Page Not Found”, or “Page Not Available”.

Or send it 404 error values for a separate website error custom tag.
Option 3: Segments Based on URLs
If your 404 error pages redirect to a static URL, such as example.com/404-error, you can create a segment based on that URL pattern.
Just ensure that you do not include a date filter in your segment setup.

Once your segment is saved, add it to the Watchlist card.
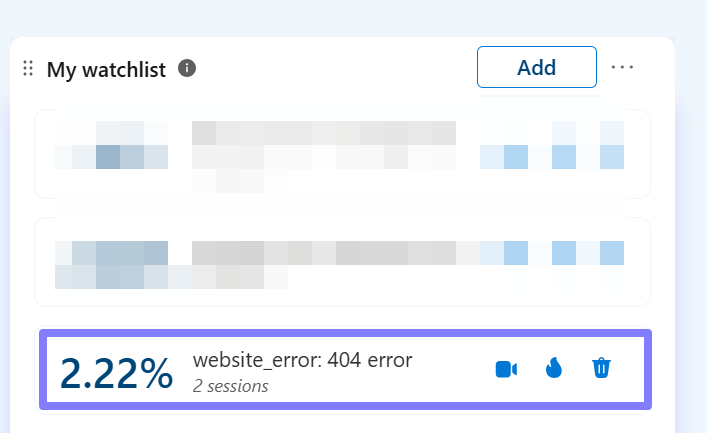
You’ll then be able to monitor the percentage and count of sessions that include 404 errors. If the numbers are high, you can dig into session recordings or heatmaps to identify the sources of these errors and decide whether they need fixing or can be safely ignored.
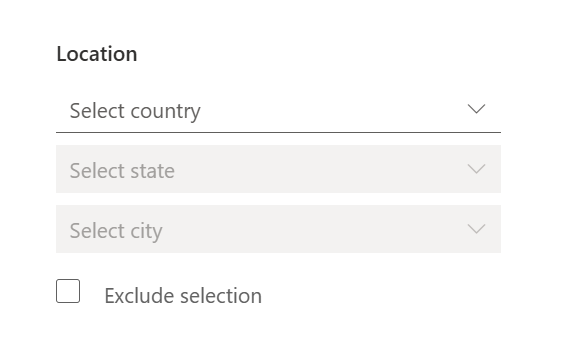
5. Regional Markets Traffic Watch
If your business operates in specific regions or markets, and you want to actively monitor how much traffic you’re getting from particular countries, states, or cities.
This is where the Watchlist card becomes especially useful.
Start by creating a segment based on geolocation data points, targeting the region(s) you’re interested in monitoring.
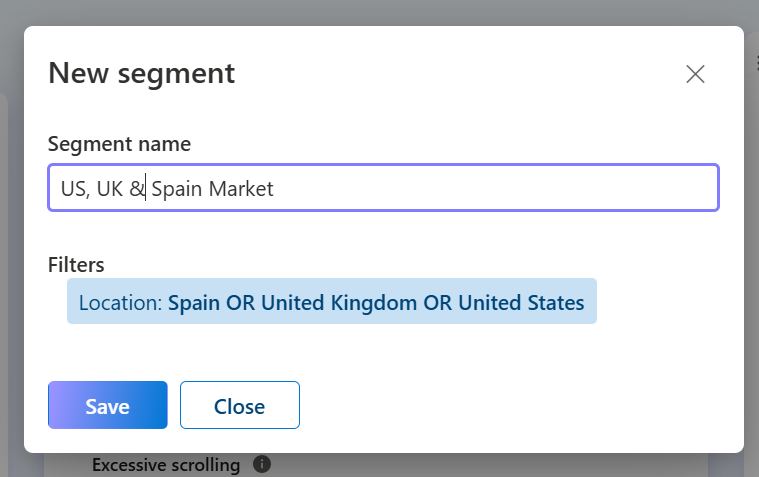
Once your segment is ready, add it to your Watchlist card to see the percentage of sessions from that region at a glance.

You can also use pinned segments, but the Watchlist card provides more flexibility. For instance, you can apply additional filters to your existing segment, something pinned segments don’t allow, without altering the segment configuration.
6. Sessions With Funnel Drop-off at Key Funnel Stages
One of the more insightful ways I’ve been using the My Watchlist feature in Microsoft Clarity is to monitor sessions where users drop off before completing a funnel on my website.
If you’ve already set up funnels in your Clarity project and want to track users who abandon at any stage, this is an effective approach.
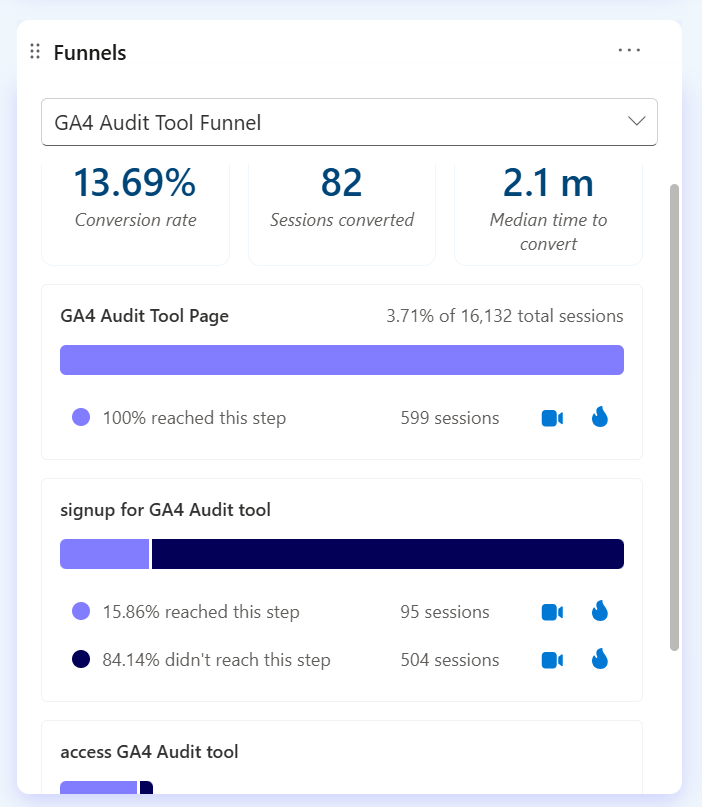
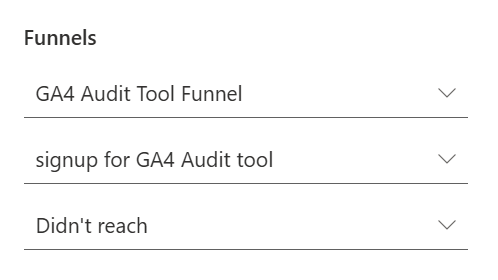
Start by creating a new segment. Choose the funnel you want to track, identify the specific stage you’re interested in, and set the status to “didn’t reach”.

This filters for sessions where users who began the funnel but didn’t complete that particular stage.
Be sure not to include a date range in your segment configuration.
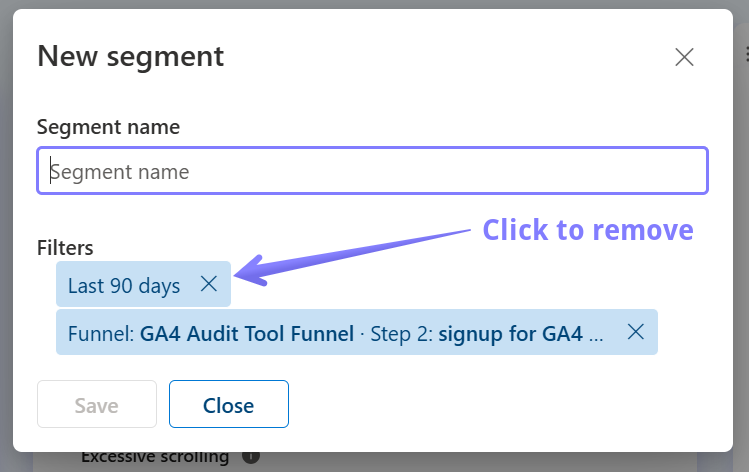
Next, save the segment and create a new Watchlist item. Select the segment you just created and add it to your dashboard.
Once set up, you’ll see the number and percentage of sessions where users started the funnel but failed to complete your selected stage. This provides visibility into where users may be dropping off in the key stages of the funnel, enabling you to take action if necessary.
7. Purchases Made on Mobile vs. Desktop Devices
Another valuable use of the Watchlist is tracking purchases or transactions based on device type, for example, monitoring how many purchases happen on mobile devices versus desktops.
If your focus is mobile, start by creating a segment where:
- The device type is set to mobile.
- A purchase smart event (either auto-events or API-based, as outlined in the Microsoft Clarity e-commerce tracking guide linked here) is present.

Save this segment without adding a date range.

Then, add it to your Watchlist by creating a new item and selecting the ‘Mobile Purchase’ segment.
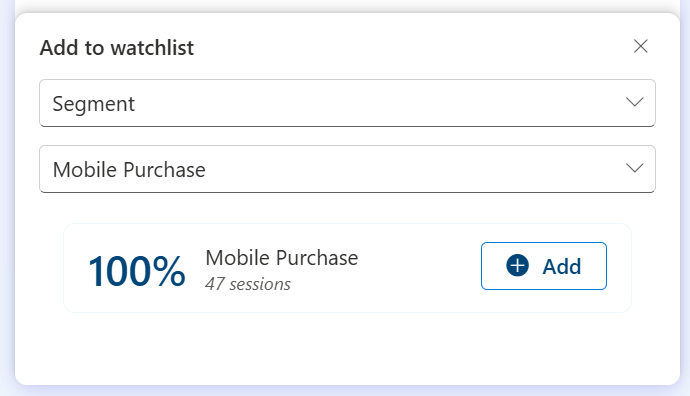
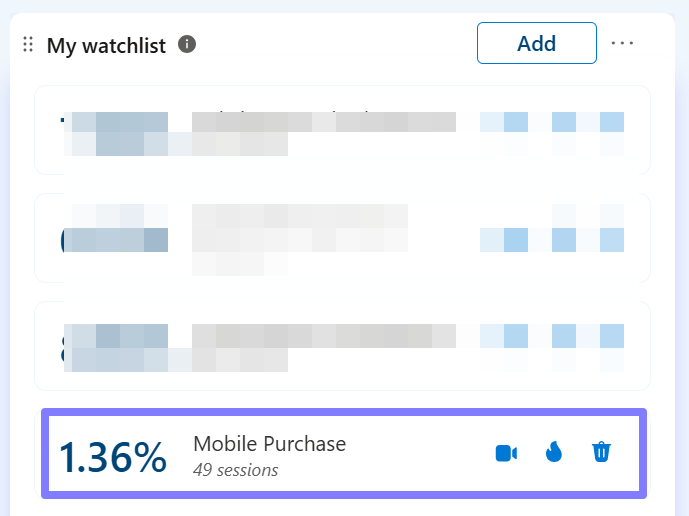
You’ll now see the percentage and count of sessions where purchases were completed on mobile devices.
To compare performance across devices, you can repeat the same steps, this time filtering for desktop instead of mobile. This allows you to evaluate device-specific behaviour and optimize accordingly.

8. Traction of a Newly Launched Product Page or Offering
If you’ve recently launched a new product page or website offering, the Watchlist is a great way to track how many users are discovering and visiting it.
Start by creating a segment based on page visits. Enter the full URL of the new page you want to monitor.

If there are multiple URLs (for example, variant pages or localized versions), include them all in the segment.

Again, avoid setting a date filter in the segment configuration.
Save your segment and then add it to the Watchlist as a new item.
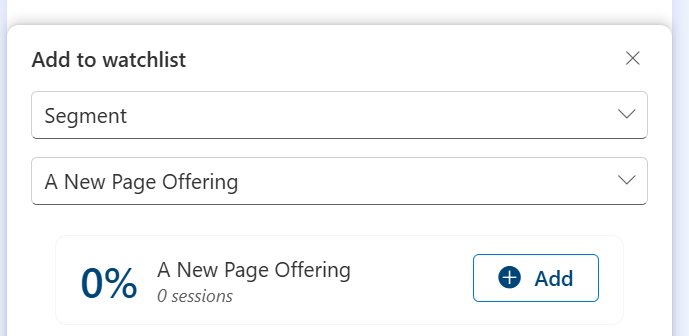
You’ll now be able to see how many sessions and what percentage of your traffic visited the new product page. This helps you evaluate visibility, gauge interest, and inform your ongoing marketing or design decisions.
9. Critical Action or Session Label
Another great use case for the My Watchlist feature in Microsoft Clarity is keeping an eye on important user actions like a key smart event you care about.
For example, if you’re tracking downloads of lead magnets on your website and you’ve already set up “Download” as a smart event (either as an auto event or via the API), you can easily create a segment around this event.
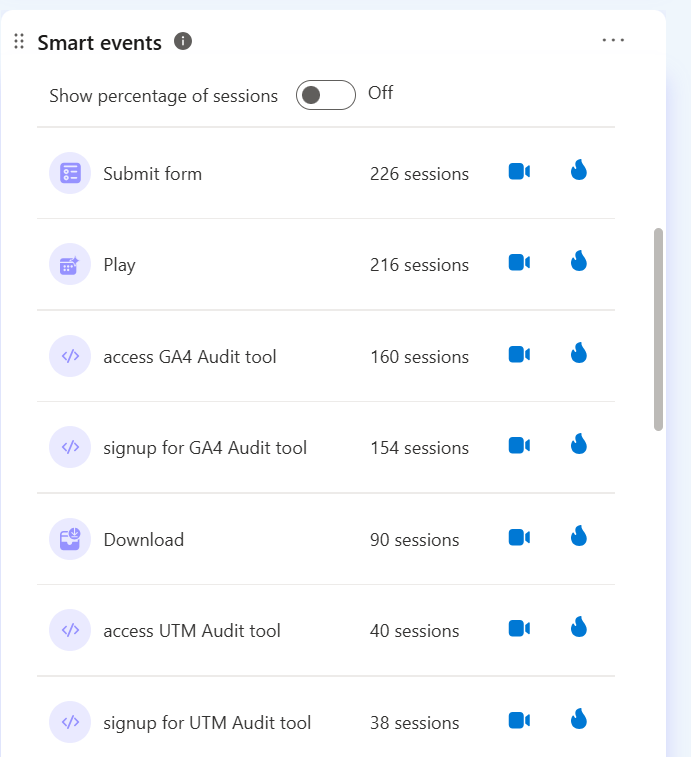
Once you’ve created and saved the segment, add it to your Watchlist by creating a new item and selecting the segment you just configured.
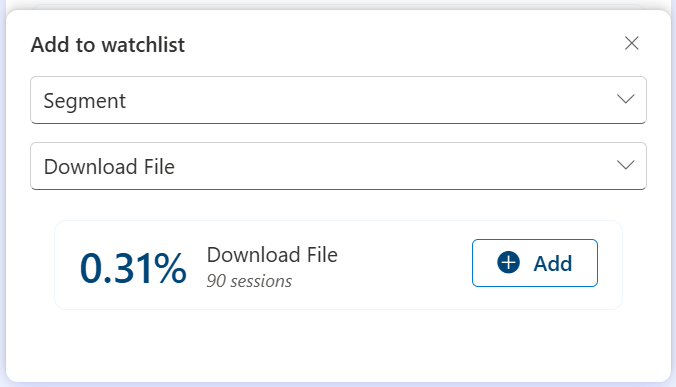
Of course, this method works for any critical action you want to monitor.
You can also use Watchlist to track sessions associated with specific labels. For instance, if you’ve labeled certain sessions as “bug” due to known technical issues, Clarity’s predefined session labels can help you actively monitor them.
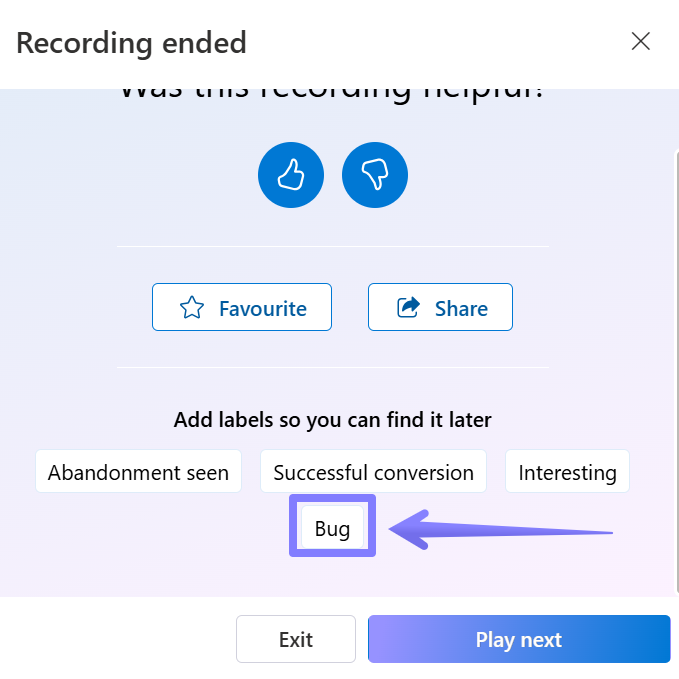
If you’re using custom labels, such as “bulk purchase” or the “flicker issue” label for scenarios where you’re running client-side experimentation programs, you can track those the same way.
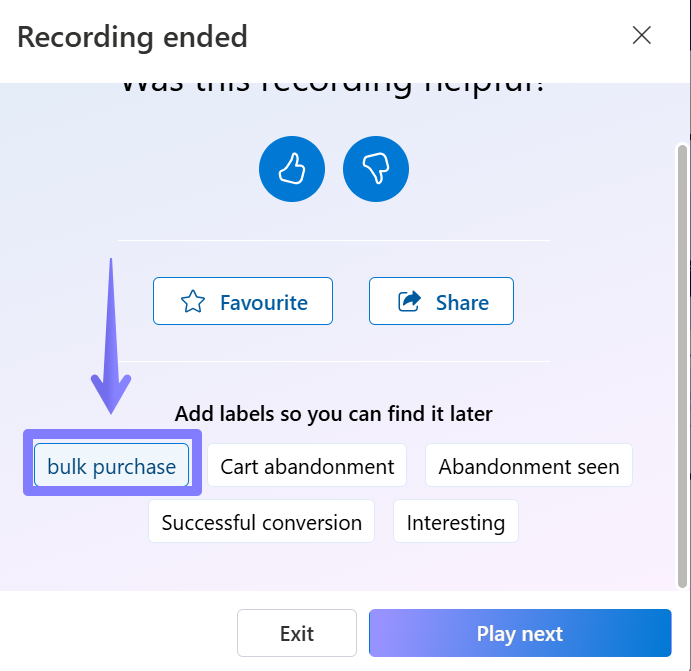
Just create a new Watchlist item, select the label type, and choose the relevant label.
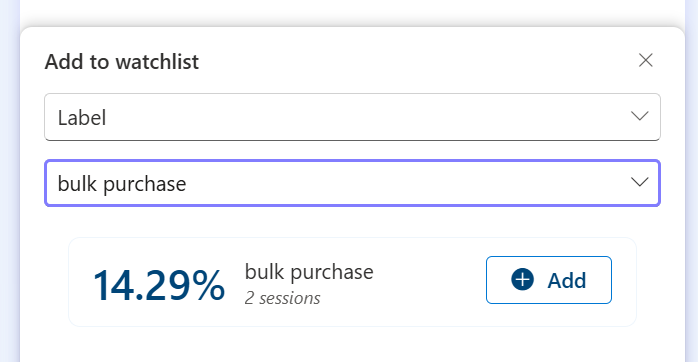
Now, you’ll be able to track the number of sessions and the percentage of visits tied to those specific labels, whether it’s a bug, a bulk purchase, or any other category.
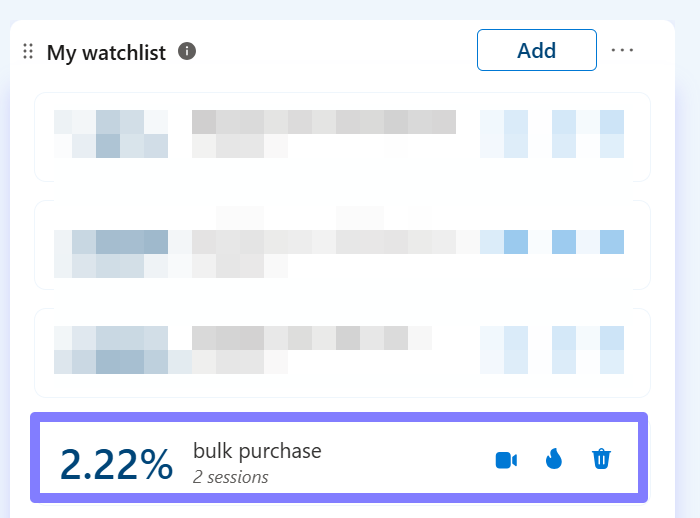
If you’re monitoring negative indicators, such as bugs or onboarding errors, this provides a great way to stay on top of issues and quickly determine whether further investigation is needed.
10. Dead Clicks or Rage Clicks During Checkout
Microsoft Clarity, out of the box, offers valuable behavioural insights, such as dead clicks, rage clicks, and quickbacks, that help you understand how users interact with your website.
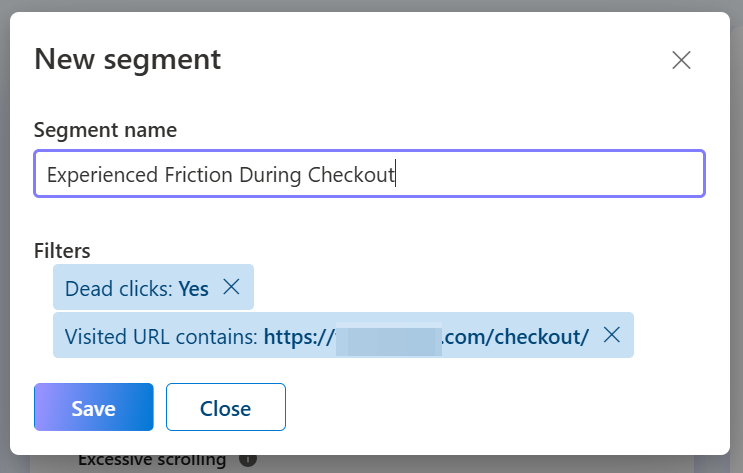
If you want to keep tabs on friction during checkout or on your conversion confirmation pages, Watchlist can help. You can create a segment that captures sessions with dead or rage clicks during those crucial stages, which is especially helpful if you suspect usability issues are frustrating your users.
Start by configuring a segment that focuses on sessions where users visited the checkout or cart page and triggered a dead click or rage click.

Save the segment and avoid applying a specific date range.
Next, add this segment to your Watchlist.

Once added, you’ll be able to see how many sessions were affected and what percentage of website visits where your website users experienced this kind of friction during their checkout journey.

This insight can be invaluable for identifying usability issues and improving the overall user experience during high-intent flows.
11. Sessions With Site Search
You can also use Watchlist to monitor how often users engage with your website’s internal search feature.
This is particularly useful for understanding content and product discoverability. Microsoft Clarity allows you to track search activity either through smart events (auto-event or API-based), URL patterns, or custom tags. (learn more about site search tracking in Microsoft Clarity here.)
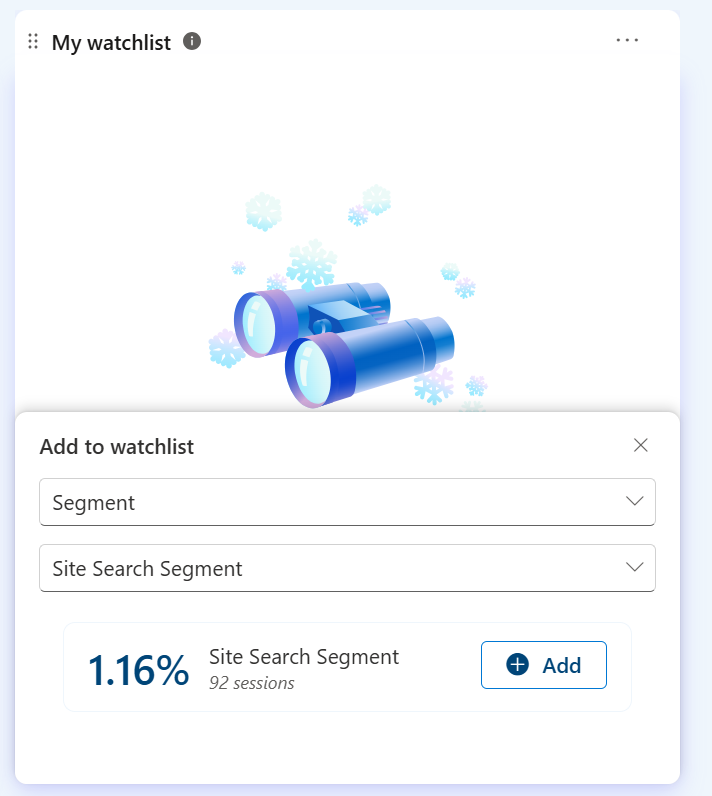
With a segment in place that captures sessions involving site search, you’ll be able to see how often visitors rely on search and whether usage is increasing over time.
You can use this information to evaluate whether users are turning to search because they can’t find key content or products easily, which might suggest the need for UX or navigation improvements.
Closing Remarks:
Now that you’ve seen some creative ways to use My Watchlist, I’d love to hear how you’re utilizing it as well.
Feel free to connect with me on LinkedIn and share your ideas; I’m always curious to learn how others are using Microsoft Clarity.
I am looking forward to seeing the amazing things you come up with. Until then, happy building a better experience with Microsoft Clarity!